
|
|
|
||
Home
»
Guide: How to convert to Quicktime videoAs you may have noticed, some of the videos on Cornica are actually relatively young. They have been converted from their original format to a retro compatible Quicktime format. Here's a step-by-step guide on how you can do that on your Mac OS machine!Convert to QuicktimeWe're assuming you have a file sitting on your hard disk that you'll want to convert. There's various ways to that. I recommend using Quicktime 6 Pro. That's what I use on my Power Mac G4 MDD. You can do this in OS9 as well as (early) OSX - the latter has the advantage of letting you do something else meanwhile.1. Register your copy of Quicktime Pro. Everything you need can be found on the Mac Garden. Registering the Pro version will enable the export videos feature. If you're on Mac OS, you may want to download & install the Cornica Sensepack for Quicktime, that will give you the latest versions of all Mac OS codecs. 2. Open the video in question. Does it playback? Good! Now open the Menu -> File-> Export... 3. Now hit the Options ... button on the right. In the video settings, choose "Cinepak" as the codec for 68k & PowerPC compatibility. Pick "high" for quality and don't choose a resolution higher than 320x240. Depending on the length of your video you may have to pick 240x180 to keep the file size in check. 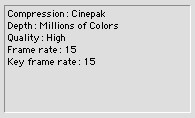
If your video is intended for PowerPC Macs too, choose the Sorenson (3) codec. In any case, I recommend setting frame rate (and key frame) to 15. You'll still get smooth playback, but it saves size & cycles. If you're converting an old video with a lower value (e.g. 12 frames per second) then don't change it. 4. Next go to sound. Switch the sound to 11khz, mono. This saves a lot MB. If your video is very audio reliant (e.g. an interview) go for 22Khz, mono. Don't go any higher. File size will explode with only moderate gains in sound quality. 5. On the last option, check "Prepare for Internet Streaming" and choose "Fast start". This will make the Quicktime videos immediately playable when embedded. (like the videos you find on Cornica) 
6. Hit "OK" and set a filename. I usually add "_ppc" to files if their codec is Sorenson so I'll be able to distinguish them from the Cinepak ones that run on both 68k & PPC. But it's up to you. 7. Start the export and grab a cup of coffee. This is going to take a while. Ah, bless those Sonnet upgrades :-) 8. Export finished? Good! Now test to see if your video exported well. Afterwards fire up your favorite FTP program and share your videos with the world :-) |
|
|
|
back to top The Apple Logo, Macintosh, Mac OS, Quicktime and are others property of Apple Inc. This site is in no way affiliated with Apple Inc. Copyright 2026 Cornica | Is this page unsafe? |
||